
Saturday, 1 November 2008
2nd One Stop Craft Challenge
This is my DT card for this weeks One Stop Craft Challenge. It was my turn to chose the theme for this weeks challenge and I chose "Things with wings" - this could be anything at all which has wings:- aeroplanes, birds, fairies, angels, to name but a few. Why not pop over to the challenge blog and have a look at all the DT projects.
Saturday, 25 October 2008
New Challenge Launch
Today sees the launch of a brand new weekly challenge over on One Stop Craft Challenge Blog. So what are you waiting for, pop over and have a look at the fabulous prize that is up for grabs this week and then join us in this, our very first challenge. You can make anything at all crafty, cards, ATC's, Fat Book Pages, Scrap book pages, skinny's etc.
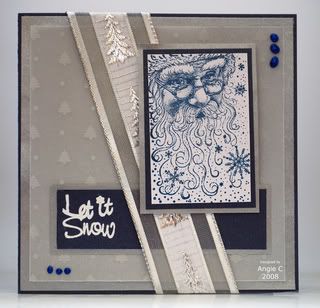
Sharon set the first challenge and has designed a great sketch, here is my DT card using the sketch
Square Navy card blank
Silver pearlescent card
White christmas tree vellum
Stickles glitter glue
Ribbon from my stash
Rubber Stampede Santa Collage stamp
Sharon set the first challenge and has designed a great sketch, here is my DT card using the sketch
Square Navy card blank
Silver pearlescent card
White christmas tree vellum
Stickles glitter glue
Ribbon from my stash
Rubber Stampede Santa Collage stamp
Saturday, 18 October 2008
Only a week
Yes, there is only a week left until the launch of a great new Challenge Blog:- One Stop Craft Challenge. Why not pop over and bookmark the challenge blog ready for next Saturday?
The challenges we run will be open to everyone. You'll be able to submit Cards, Scrap Pages, ATCs, Fat Book Pages, boxes, tags, anything you want to, as long as it's crafty. There will be prizes and winners too.
Look forward to seeing you there!
The challenges we run will be open to everyone. You'll be able to submit Cards, Scrap Pages, ATCs, Fat Book Pages, boxes, tags, anything you want to, as long as it's crafty. There will be prizes and winners too.
Look forward to seeing you there!
Friday, 17 October 2008
TMTA - Ophelia
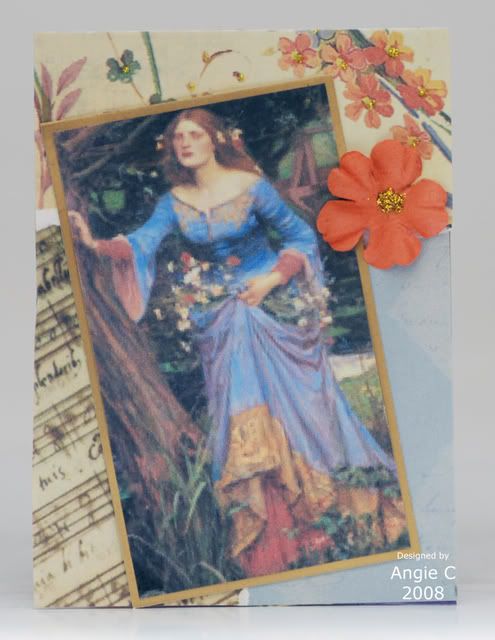
This weeks challenge on Think Monday Think ATC is "Ophelia". I made this ATC the other day, but have only just found the time to blog it - still, better late than never I guess :-)
I used various papers, including K&Co, DCWV, a printed picture of "Ophelia", an orange prima flower and a little glitter glue.
Monday, 13 October 2008
Another Match Box
This is the match box with tags I made for a "Me to You" swap I'm involved in - every month we have to make something and post it off. I used distress inks, Hampton Art stamps, some script background paper, black archival ink and Cosmic Shimmer Ultra Thick Crystals. I tripple embossed the outside of the match box and stamped using black ink into the UT crystals, whilst they were still hot - this gives a lovely texture to the box.
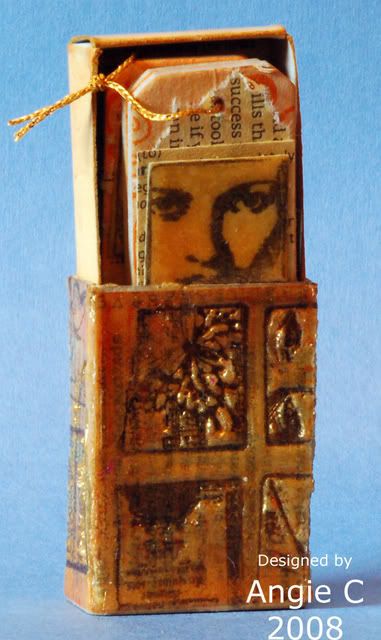
 please click on pictures for a larger view
please click on pictures for a larger view
Sunday, 12 October 2008
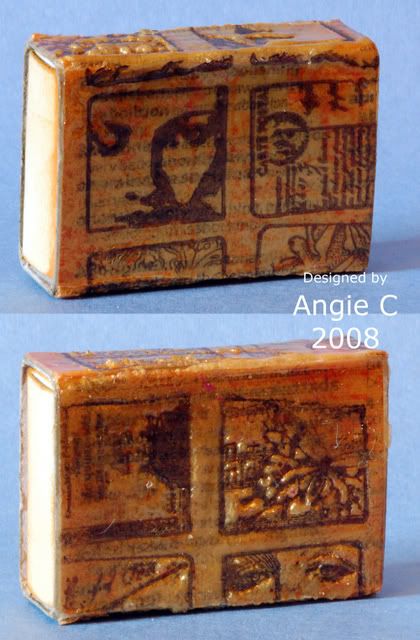
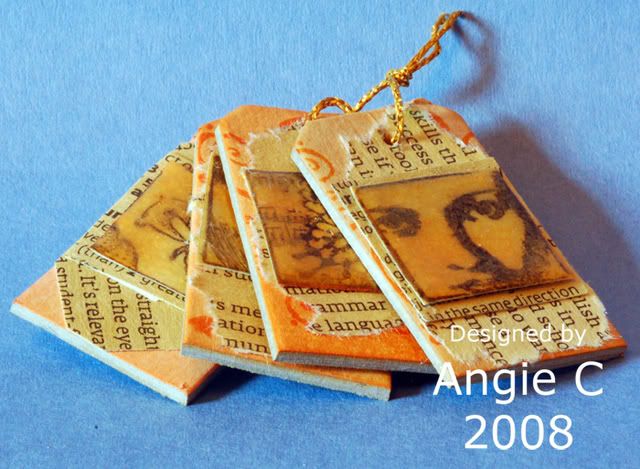
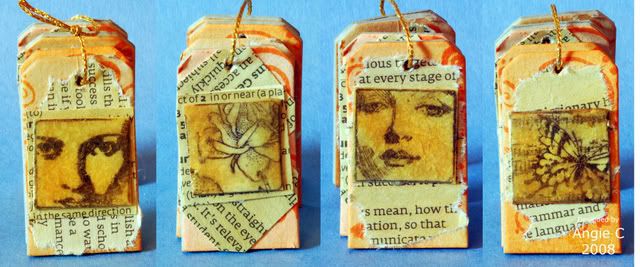
Christmas Match Box
This is a match box I have altered. I used a blank match box, 4 tiny chipboard tags, distress inks, Cosmic Shimmer Ultra Thick Crystals and various small Christmas stamps. The match box measures 2" x 1 1/2"
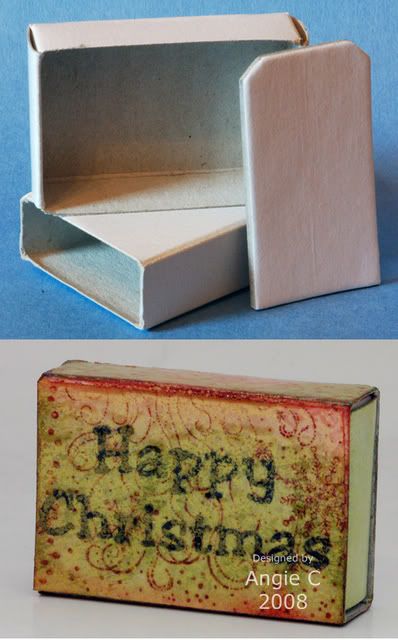
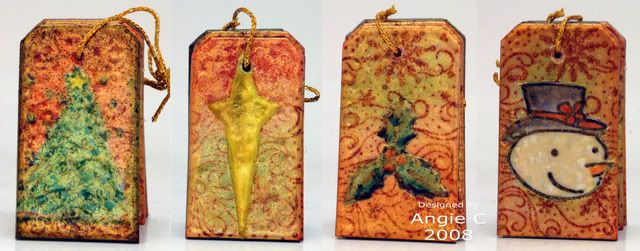
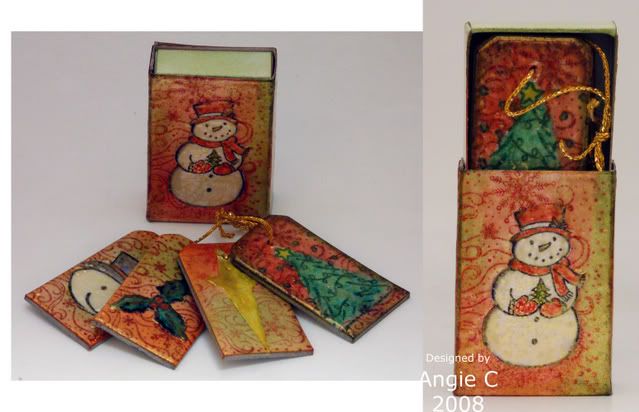
Instructions for how to make this will appear on One Stop Card Crafts project page shortly.
Please click on pics for a larger view
Instructions for how to make this will appear on One Stop Card Crafts project page shortly.
Please click on pics for a larger view
Wednesday, 8 October 2008
Another Medallion Card

Here is my second DT card, for One Stop Card Crafts, which I made today.
I think I might have found a "new love" medallion cards - they do look so Christmassy with all the glitter.
My crafting area looks nice and Christmassy too as that and everything else seems to be covered in glitter LOL
Instructions for this card are now on One Stop Card Craft projects page
First Design Team Card
Last Friday I received my first lot of DT goodies from One Stop Card Crafts and they included a lovely Morning Star Medallion stamp. I was busy over the weekend so I didn't get chance to use the stamp until yesterday.
As you will see there are two versions of the same card as when I first made the card I added some ribbon and then I wasn't sure about it so took it off and added snowflake brads - still not sure which I like the best.
As you will see there are two versions of the same card as when I first made the card I added some ribbon and then I wasn't sure about it so took it off and added snowflake brads - still not sure which I like the best.

Tuesday, 7 October 2008
Tag Book
This book I made for a swap I'm involved in "Me to You" and I sent this to my dear friend Claire.
The front and back covers were made using chipboard which I bought from The Artistic Stamper, they are 4" x 6". I used a brayer and a Big and Juicy birthday ink pad to colour the chipboard and then gave them a spray of gold Glimmer Mist. On the front I added a Papermania wire word Friends. I then stamped various stamps using black ink. The back cover was made in the same way and I used one of my new Tim Holtz stamps nibs.
The front and back covers were made using chipboard which I bought from The Artistic Stamper, they are 4" x 6". I used a brayer and a Big and Juicy birthday ink pad to colour the chipboard and then gave them a spray of gold Glimmer Mist. On the front I added a Papermania wire word Friends. I then stamped various stamps using black ink. The back cover was made in the same way and I used one of my new Tim Holtz stamps nibs.
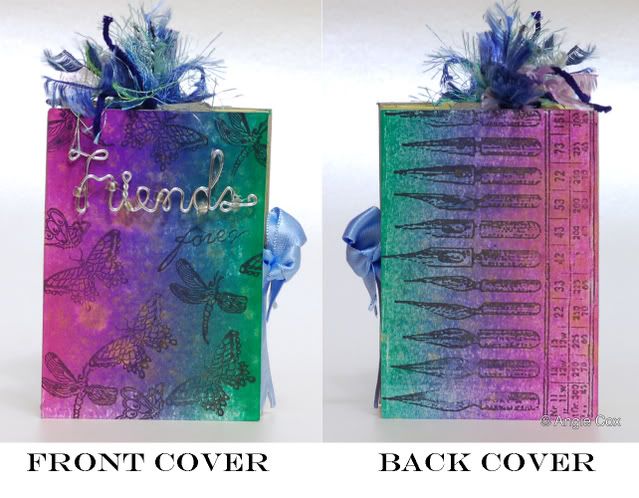
The pages/pockets were made from a piece of A4 card, which I coloured using distress inks in various colours. Before I attached the covers to the concertina pages/pockets I added some blue ribbon so the book could be kept closed.
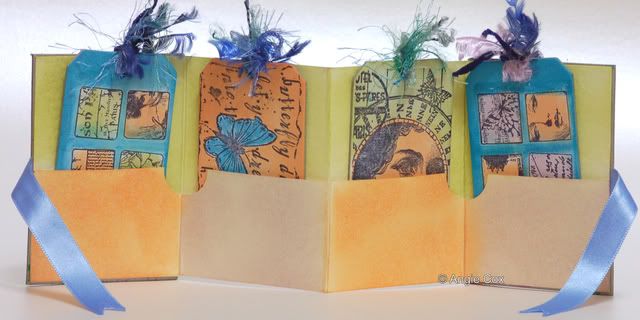
The tags are again chipboard from The Artistic Stamper. I used various stamps again, stamped in black ink. I then used distress inks and an ink blending tool to colour the tags. I then added some fibres to the tags and they were finished.
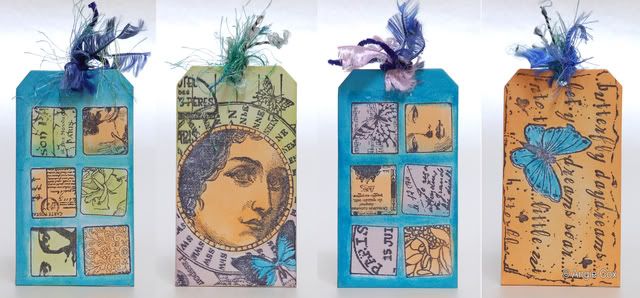
click on images to view larger
I have also entered this into Caardvarks Challenge, which this week is to use scoring
Monday, 6 October 2008
Pyramid Book
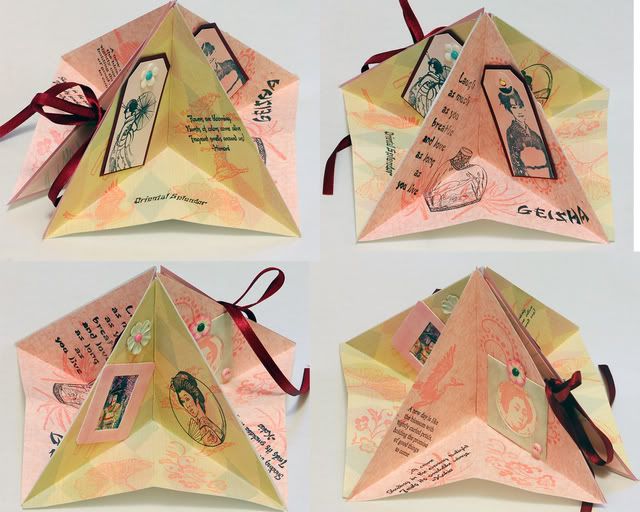 On Saturday I went on a workshop arranged by Cath from Katy's Corner and I had a great time :-)
This is the pyramid book I made on the workshop - I have to admit that it still isn't quite finished as I've not completed the front cover yet - the covers are on, but I need to put something on the front.
I love this shape of book and can see me making more very soon. I used four pieces of 6" x 6" scrapbook paper to make the inside of the book (2 sheets of 2 designs). I used various stamps and inks, and embellished it using slide mounts, buttons, brads and tags.
This weeks challenge on Caardvarks is to make something with scoring.
Friday, 3 October 2008
In my pocket there is a leaf
This weeks challenge over on Hels blog is to make a pocket with leaves inside and also to use rich Autumnal colours. 

I used distress inks on the outside of my pocket and the front of the flap I put a couple of mulberry paper leaves and then mounted a picture which I got off the internet. Inside my pocket I used Crafty Individuals papers. Inside the flap I used another picture off the internet, again mounted onto some leaves. The main part of my pocket has a photo which my OH took of a tree with lovely orange leaves - I mounted the photo onto some gold card and added it to my pocket. I stamped the word Leaf and added a couple of punched out leaves. To finish it off I added a photo turn so the pocket could be closed.
Thursday, 2 October 2008
No Crafting Today
Well I haven't managed to do any crafting at all today, but I did call in a local craft shop. To my amazement they had some Tim Holtz / Stampers Anonymous stamps in a bargain basket at 60% off. Well it would have been rude not have bought some :-) I managed to get approx £68 worth of stamps for £27 - not bad I thought. I may have to go back again and get some more when OH isn't with me LOL These are what I got. Just need to use them now - or are they too nice to use?

Wednesday, 1 October 2008
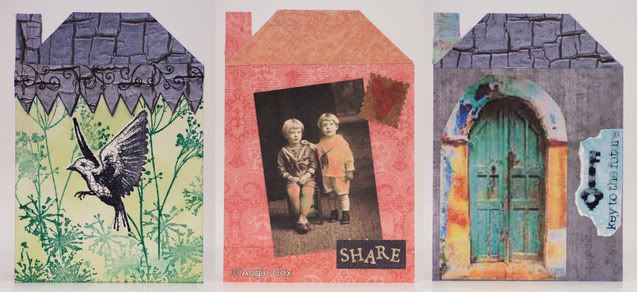
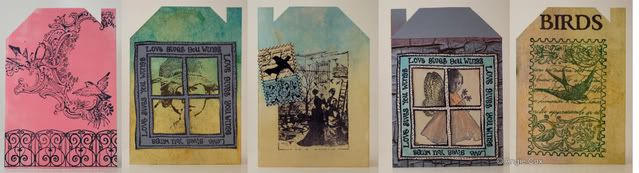
My Final Houses
At last I've finished all ten of my houses for a swap I'm involved in. These are the final three, so they are all ready to be put in Royal Mail's hands tomorrow.
For the left house I used some Tim Holtz/Stampers Annonymous stamps, the bird and the flowers. The background is inked using distress ink and the roof and chimney is some scrapbook paper which I cut out to fit the house. I stamped a Paper Artsy stamp onto a piece of the scrapbook paper and cut out the image to make the zig zagged edge.
The middle house is covered using some DCWV papers and the image of the children is one I downloaded from the web, and I added a hint of pink to the image with distress inks. I added a HOTP ribbon word "share" and a little faux postage stamp with a heart.
The right hand house is again covered with DCWV papers and another piece of the scrapbook paper for the roof and chimney. The doorway image is printed from the pc and the little key and saying is a rub on.
Tuesday, 30 September 2008
Some Exciting News
Well today I have had some great news and I'm really excited. I've been chosen to join the Design Team for One Stop Card Crafts. I've been jumping around the house all afternoon since I found out.
They have an online shop which can be found here and also a blog which is here. Why not pop over and have a look, the shop has lots of goodies and there is also a discount scheme so the more you spend the more you save - and you even get free p&p within the UK.
Congratulations also to the other DT members:-
Donna Ferguson - Luvocardz
Sharon Traynor- Cards n Greetings
Nikki Austin - Its the day to ....
Margaret Woodward
Paula Cross
Eleanor Docherty
Thursday, 25 September 2008
Altered Canvas
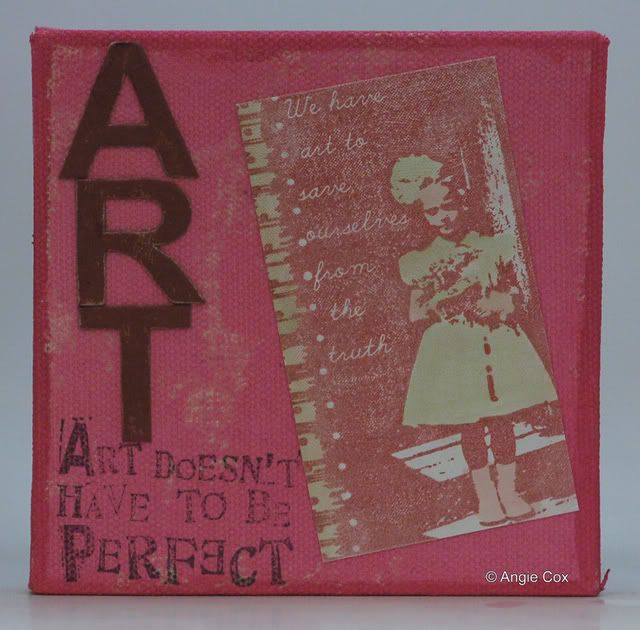 This small canvas I altered for a forum friend as part of a "Me to you" swap I'm involved in. I used acrylic paints, chipboard letters, stamps and distress inks. It was hard to get a photo showing the true colour, it is much lighter in "real life".
please click for larger view
Monday, 22 September 2008
Half a Street
Here are some more houses I made for the house swap I'm involved in - only 4 to go now. I used distress inks and various stamps to make these.
Thursday, 18 September 2008
Friends Fat Book Page
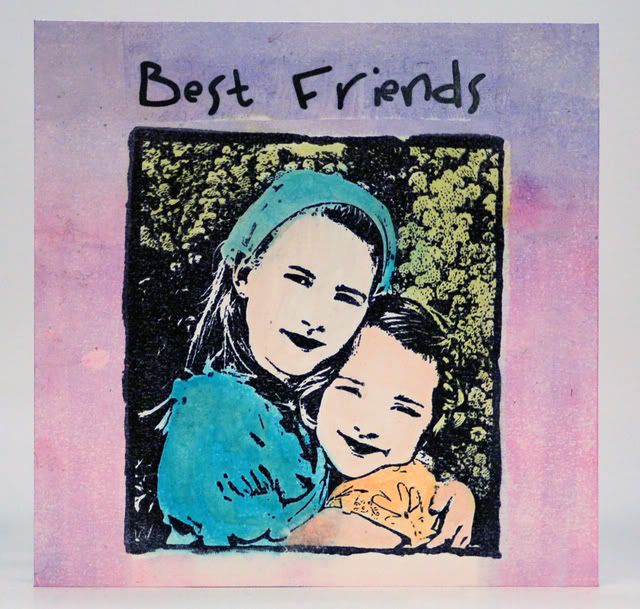
I came across another challenge blog today whilst blog hopping - Theme Thursday. This weeks challenge is to make a 4" x 4" page using the theme of friends.
For my page, I firstly stamped a paperbag studio stamp onto white cardstock using black ink. I then masked the image off and used a brayer and a brilliance three colour ink pad to make my background. I added the words best friends and coloured the stamped image using distress ink pads.
Wednesday, 17 September 2008
My First House
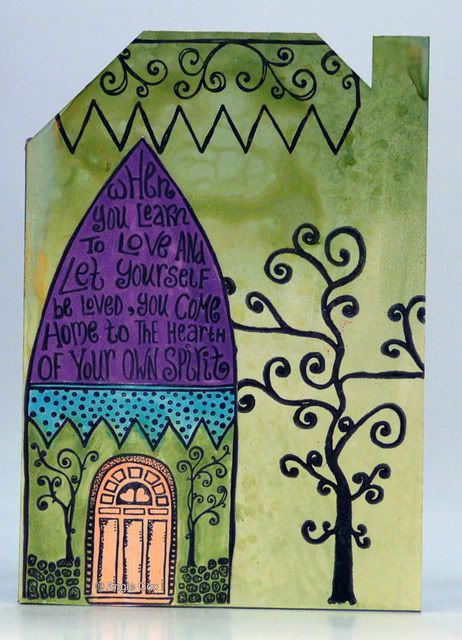
This is the first house I've made. It is for a swap I've joined and I have to make a total of 10 houses.
I used thick white card and cut out the house shape. I then used distress inks and gold glimmer mist and the stamps I have used are from Paper Artsy.
Inky Pocket
Today I have made a pocket for Hels in my pocket challenge. The challenge this week is to have a bottle cap hidden inside your pocket.

I used a thick white piece of card and cut it following the instructions on Hels blog. I used various stamps and adirondack & distress inks and of course a bottle cap into which I put a fabric flower with gem centre.
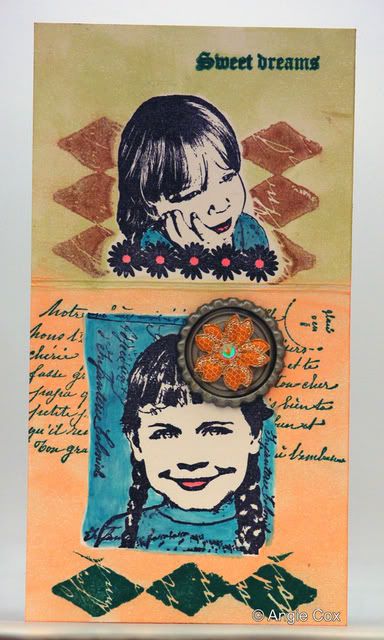
Basic Grey ATC
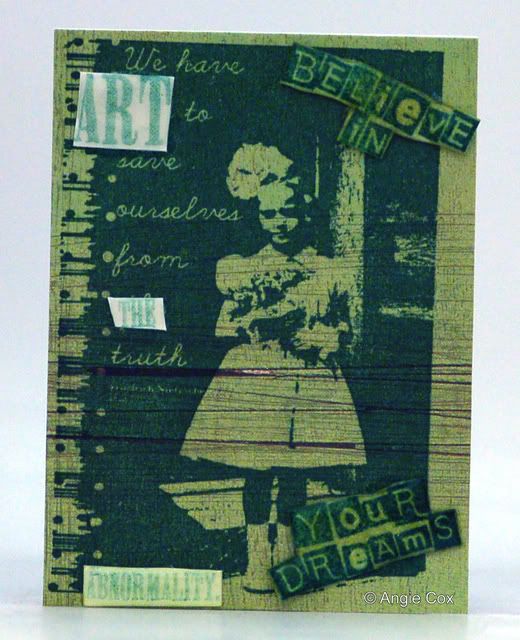
Whilst blog hopping I came across a new challenge site which is based around using Basic Grey products. Unfortunately I missed the 1st weeks challenge, but I have joined in with the 2nd challenge, which is to make an ATC. The challenge blog can be found here.
For my ATC I used Basic Grey aged & confused paper from the sublime collection as a base for my ATC. I then stamped the girl photo art collage stamp (I Brake For Stamps) using versamark green ink directly onto the BG paper. I used various other word/saying stamps, again using green ink and then cut out the words I wanted to use. I tripple embossed the saying believe in your dreams (Cats Life Press). The other words I used 3d gloss on to make them stand out.
Sunday, 14 September 2008
Birthday Thank You's
Well earlier this week was my Birthday, so I just wanted to say a huge thank you to those who sent me cards and handcrafted gifts. I will get some photo's of the cards etc. on my blog soon.
So big thank you's to the following people:-
Alison, She, Bee
Andrea, Jo, Claire
Hels, Vanessa, Gillian
Jacqueline, Debi, Rachel
Nicky, Shaz, Wendy
Shazza, Tracey, Hilda
Barbara, Joy
Monday, 8 September 2008
Thursday, 21 August 2008


Bright and Beautiful
This card I made for the Cute Card Thursday challenge, which this week is to use bright colours on your card. I also used this weeks sketch from the Papertake Weekly challenge - so one card, two challenges.
I had fun making this card as I don't normally use such bright colours. The stamped image is another Alota Stamp, stamped using black stazon and coloured using Marvey Le Plume pens.

Wednesday, 20 August 2008
Buzzing By
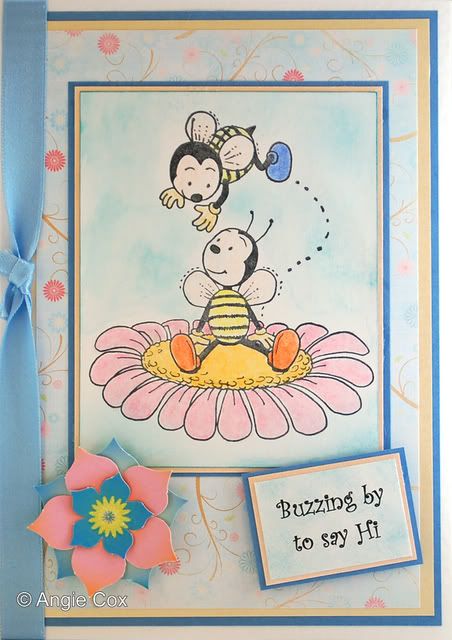
I received my new Alota Rubber Stamps from the USA and just had to use some of them straight away. This stamp I just had to buy as I thought it was so cute and could be used for many occasions - it is quite a large stamp too, approx 3 3/4" x 4 1/2".
I stamped the image onto some white card using black archival ink and coloured the design using prismacolour pencils blending with sansador. I used a blue distress ink and lightly swirled some ink around the image to create a sky look. The dp I used on this card is from Sweet Shoppe Designs and the sentiment I printed from my pc and again coloured with blue distress ink. To finish the card off I added a paper flower from a K & Co "make a flower" pad and a light blue ribbon from my stash.
Little Froglet

This is another card using my new stamps from Alota Stamps. I just thought this was a very fun stamp set. The main image is another large stamp and measures approx 3 1/4" x 4 1/2"
I stamped the main image using black archival ink onto white card and coloured using Prismacolour pencils, blended with sansador. I edged around the image using a light green distress ink. The sentiment I stamped in the same way onto white card and coloured using distress ink. The papers are from my stash and I simply added a paper flower from K & Co "make a flower" pad - the flower looks much nicer and more 3d in the "flesh"
Sunday, 17 August 2008
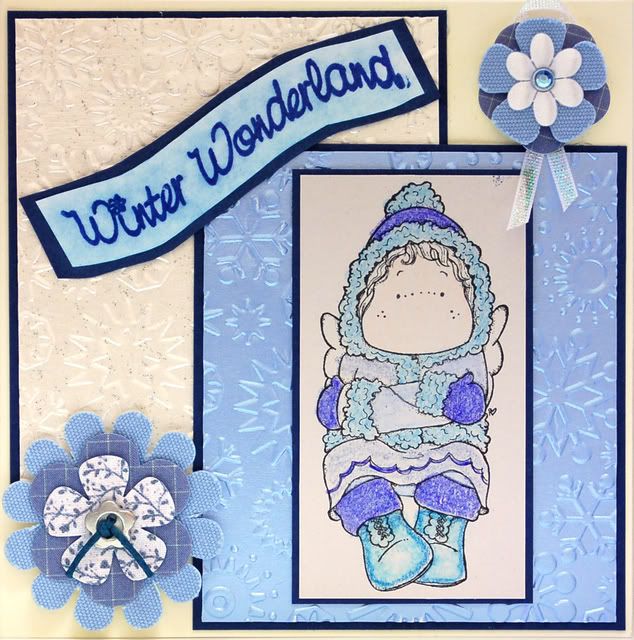
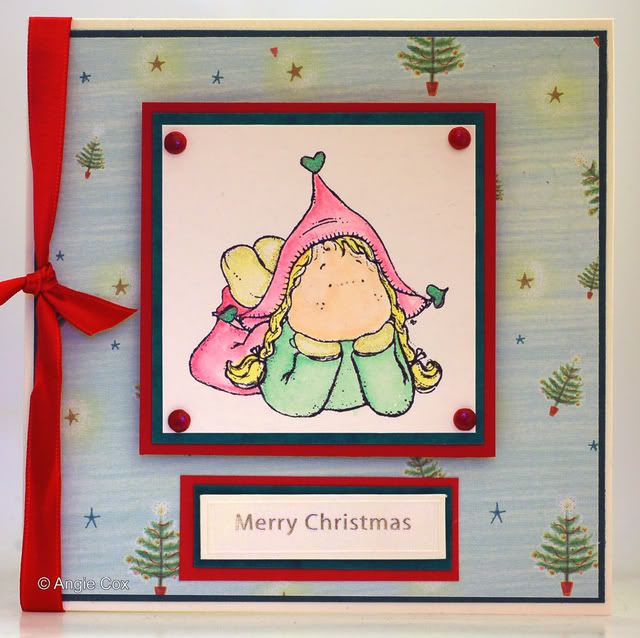
Christmas Tilda
 I only managed to make one card today and it is another Christmas card.
This card is for the Tilda & Co weekly challenge and this weeks challenge is "As cold as ice" and you have to make something using only blue and white and of course your project must include a Magnolia stamp.
I coloured my Tilda using prismacolour pencils, blended using sansador. I used a little glamour dust (very fine glitter) for her wings, but it doesn't show up too well in the photo. I used my cuttlebug snowflake embossing folder and embossed some pearlescent blue card and also some white glittery card. I cut both of these to the same size and matted them onto some navy blue bazzil card. The Winter Wonderland is a clear stamp (sorry don't know who by), I stamped onto white card using blue versafine ink pad and then chalked over it with pearlescent blue chalk and then I matted this onto navy bazzil card. The two embellishments I added are from Papermania.
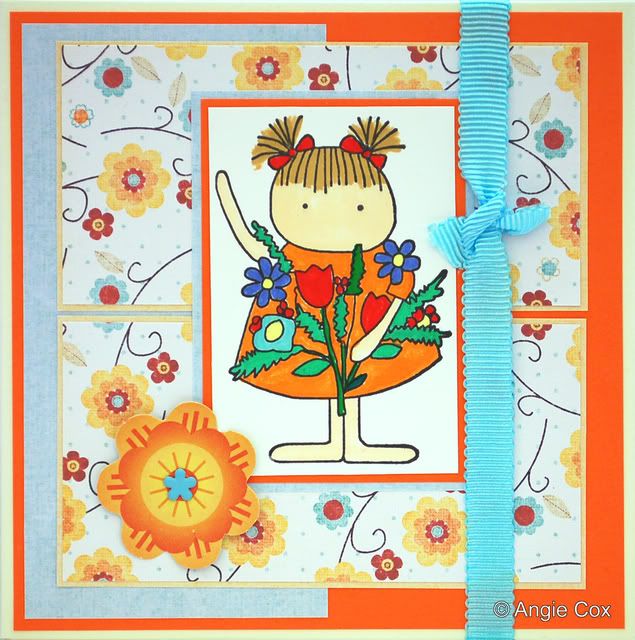
A Very Crafty Day - 3 different Challenges
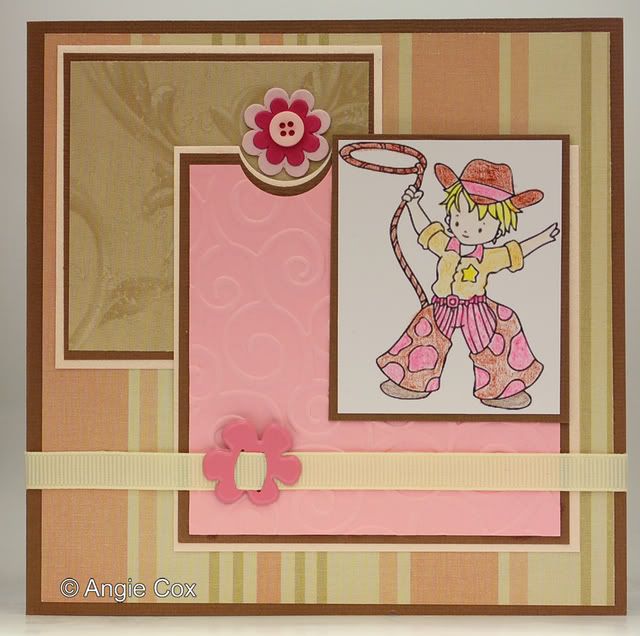 Well today I have made three cards, which I must say is really good for me!
This first card I made using a great sketch which Claudia put on her blog - Pretty Pressings. If you haven't visited Claudia's blog, you really must as her cards are so beautiful.
For this card I used brown bazzil cardstock for my base card and made a 6" square card. The papers I have used are from K & Co and the lovely cowboy/girl stamp is from Alota Rubber Stamps. I only have this one Alota stamp, but I love it so much I've ordered the Western set and a few others from Helene at Alota stamps. I used my cuttlebug swirls embossing folder on the pink cardstock. The button flower, ribbon and ribbon slider are from my stash.

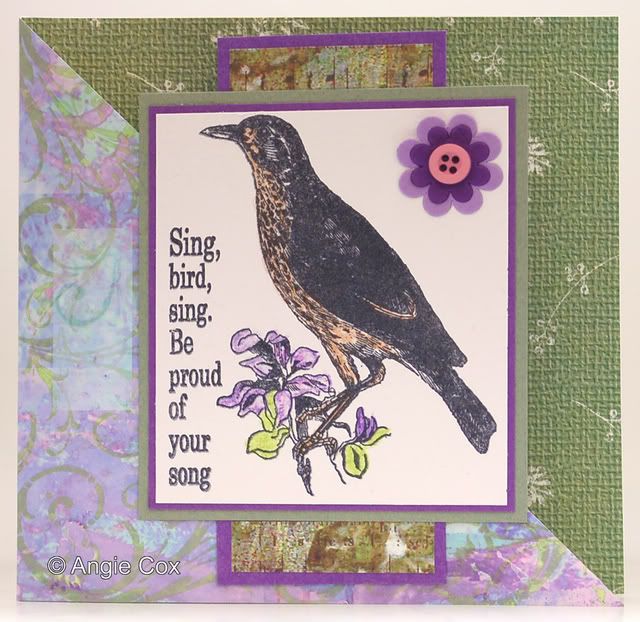 This second card I made using this weeks sketch on the Sketch Saturday Challenge Blog.
This weeks challenge over on One Powerful Hour Challenge Blog is feathery friends.
The stamp I used is from Artistic Stamper and I stamped it onto white card using black archival ink and coloured using my prismacolour pencils. The papers and button flower were from my stash.

 This final card for today I made for the Friday Sketchers Challenge Blog - this weeks great sketch was set by Mumur.
I decided it was about time I made a start on Christmas cards and this sketch was the ideal opportunity to do so. The papers I used are by Hot Off The Press, the stamped image is Scribble by Funstamps. The brads, snowflake stickers, white fibres and little joy tag are from my stash.

Thursday, 14 August 2008
Penny Black Challenge
 This is another first for me, joining in with the Penny Black Saturday challenge. This week is a sketch and you must use at least one Penny Black stamp on your card.
I stamped the PB stamp onto white card and coloured it using prismacolour pencils. The "just a note" stamp is from Studio G and the little red flowers and gold brads are from my stash.
In My Pocket .....
This weeks challenge on Hels blog is "in my pocket there is a postage stamp". Well I've not done the "in my pocket" challenge for a few weeks so I wanted to take part this week. I found this one so hard to do and didn't really have any suitable embellishments etc.

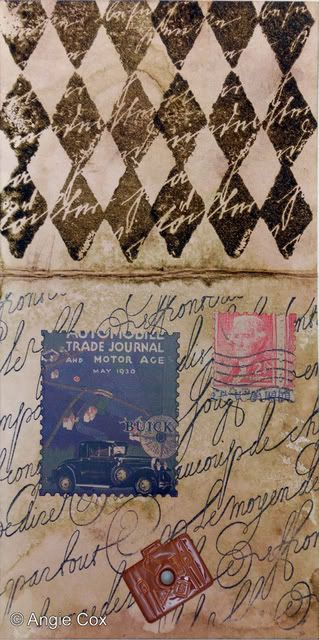
Anyway I covered the front flap of my pocket with Basic Grey paper and stamped an old car (Cats Life Press stamp) onto it using distress ink. For the inside I stamped the diamond backgroud stamp on the inside of the flap and then a loopy calligraphy stamp (Lost Coast Designs). I then added a couple of die cut stamps and to finish it off and also to help keep it closed I used a suitcase eyelet.
Tuesday, 12 August 2008
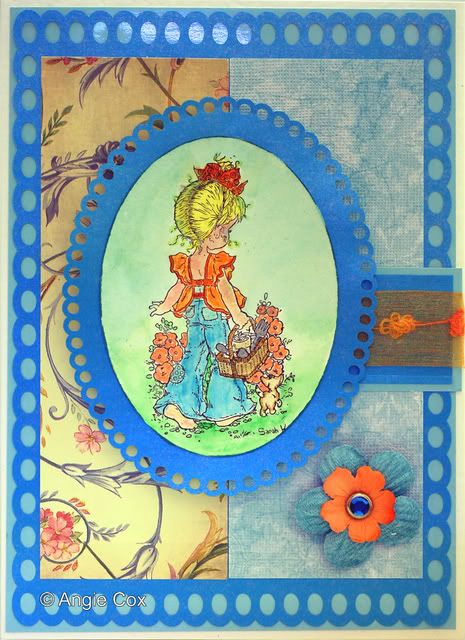
Sarah Kay - Week 6
.jpg)
I dusted off my Craft Robo and used it to cut out my scalloped oval and also the large scalloped rectangle. The papers I used are from DCWV and the blue flower is a Bazzil Bling with a small prima on top. I stamped my image using black stazon and coloured most of the image with prismacolour pencils and the the flowers I water-coloured using sakura gel glitter pens. I then used some distress inks to do the grass and sky.
Christmas Is Coming - Tilda & Co
This weeks challenge on Magnolia Challenge blog is to make a Christmas card and you have to use at least one Magnolia stamp. This card was really quick to make, but I do like the finished card. I don't have a Christmas Magnolia stamp, so I plumped for this Tilda image which one of my SBS sisters sent me (Fairymadjo) a while ago. I watercoloured the image using sakura gel glitter pens and it has a lovely shimmer to it. I then simply layered the image onto some green and red card. The paper I used on this card is from Papermania and to finish it off I just added some ribbon.
Subscribe to:
Posts (Atom)
